Every time we type kubectl apply -f deployment.yaml in the terminal, it feels like something simple is happening: the CLI talks to the master node over HTTPS, hands over the manifest, and it neatly lands in etcd. If everything were really that simple, distributed systems wouldn't cause nearly as many headaches during troubleshooting.
In reality, behind that one-liner sits a strictly deterministic pipeline of checks and transformations. kube-apiserver is the only component in the Kubernetes control plane with direct access to etcd. Neither the scheduler, nor the controllers, nor the kubelet agents on worker nodes are allowed to read from or write to the database directly. They are all clients of the API server, just like your local terminal.
Let's trace the entire journey of a network packet from the moment you run the command to the transactional commit of a key in etcd's Raft log.
Phase 0: From Terminal to HTTP Handler
It all starts on your laptop. The kubectl CLI reads your context from ~/.kube/config, parses the manifest, and builds an HTTP request. In modern clusters, the client typically sends a PATCH request using Server-Side Apply or a POST to the resource endpoint:
POST /apis/apps/v1/namespaces/default/deployments HTTP/2
Host: k8s-master.corp.local:6443
Content-Type: application/json
Authorization: Bearer eyJhbGciOiJSUzI1Ni...
When the request hits port 6443, kube-apiserver terminates the TLS connection. The server is written in Go and structured as a chain of nested middleware. Utility filters fire first: an audit ID is attached, metric timers start ticking, and API Priority and Fairness (APF) limits are checked. If the server is overloaded, APF can immediately reject the request with 429 Too Many Requests. If there's capacity, the request moves on to authentication.
Phase 1: Authentication — "Who Are You?"
The main job of the Authentication stage is to establish the identity of whoever knocked on the API's door. Notably, Kubernetes doesn't store user accounts (Users) in its own database at all: a user is simply a name and a list of groups vouched for by an external source of trust.
The server passes the incoming request through a chain of configured authenticators:
- X.509 client certificates: the username is extracted from the Common Name (CN), and groups from Organization (O).
- Bearer tokens: service account tokens are verified against the cluster's public keys.
- OpenID Connect (OIDC): external JWTs from corporate identity providers (Keycloak, Okta) are validated.
- Webhook Token Authenticator: verification is delegated to an external service via the TokenReview API.
As soon as one of the authenticators successfully identifies the client, it constructs a user.Info struct (username, UID, groups) and attaches it to the request context. If no plugin recognizes the client, the request is aborted with 401 Unauthorized.
Phase 2: Authorization — "Are You Allowed to Do This?"
Now the server knows the visitor's name. The next question: is this user allowed to perform a create operation on deployments in the default namespace?
That's the authorization pipeline's job. Authorizers are queried sequentially:
- Node: a specialized authorizer that restricts a kubelet's permissions to resources on its own node.
- RBAC: matches the tuple
{user, groups, verb, resource, namespace}againstClusterRoleBindingandRoleBindingrules. - Webhook: calls out to external authorization services.
It operates on a first-match-allow principle: if at least one module allows the action, the request moves forward. If every module denies it, the client gets a 403 Forbidden.
Phase 3: Admission Controllers
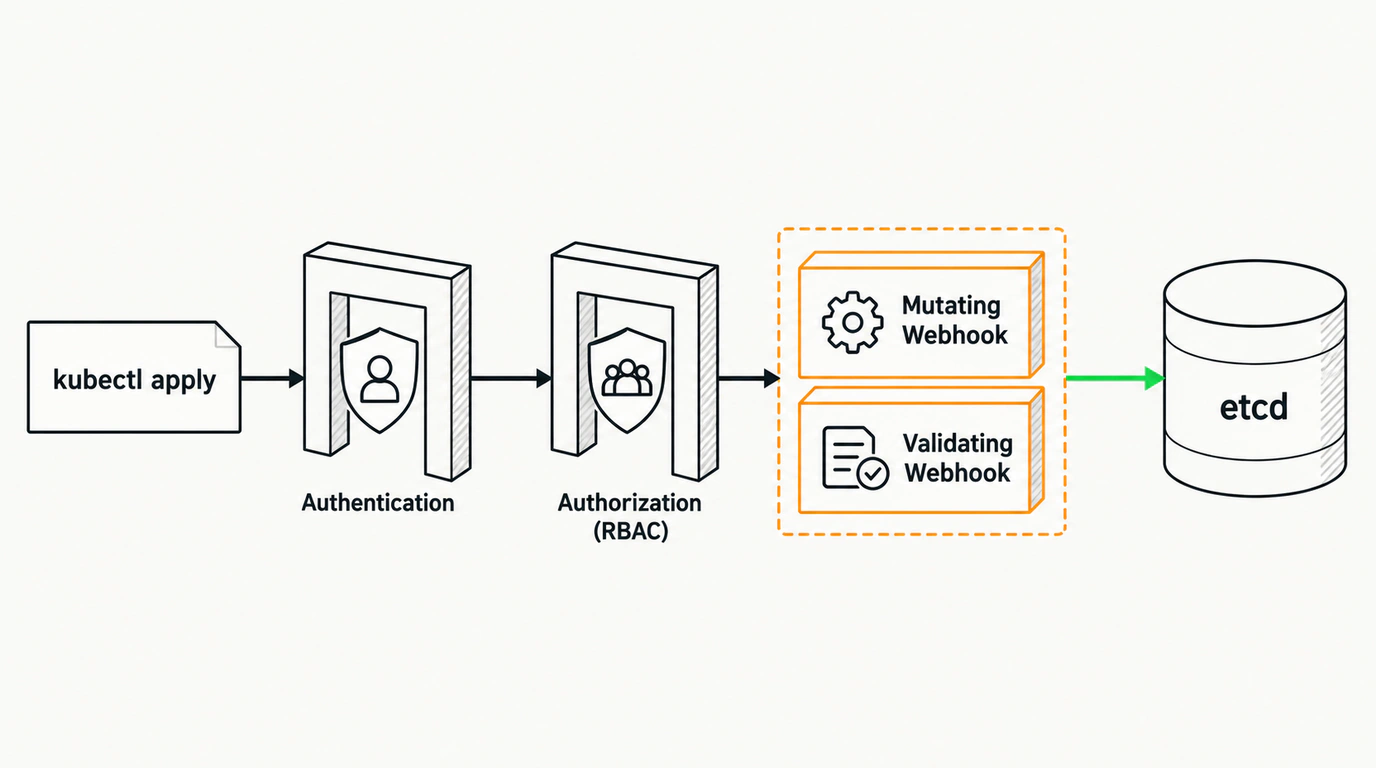
After RBAC, the request enters the admission controllers, which are split into two phases.
Diagram of Kubernetes Admission Webhooks in action: sequential manifest modification by a mutating webhook and parallel policy checks by a validating webhook.
Mutating Admission
Mutating controllers fill in default values or modify the manifest. Both built-in plugins and external MutatingAdmissionWebhook endpoints run here. For example, a Service Mesh like Istio intercepts a pod spec and injects sidecar containers into it.
Here's a minimal Go webhook handler that adds a service label:
package main

import (
    "encoding/json"
    "net/http"
    admissionv1 "k8s.io/api/admission/v1"
)

func handleMutate(w http.ResponseWriter, r *http.Request) {
    var review admissionv1.AdmissionReview
    if err := json.NewDecoder(r.Body).Decode(&review); err != nil {
        http.Error(w, "bad request", http.StatusBadRequest)
        return
    }

    patchOps := []map[string]interface{}{
        {"op": "add", "path": "/metadata/labels/audit-verified", "value": "true"},
    }
    patchBytes, _ := json.Marshal(patchOps)
    patchType := admissionv1.PatchTypeJSONPatch

    response := admissionv1.AdmissionResponse{
        UID:       review.Request.UID,
        Allowed:   true,
        Patch:     patchBytes,
        PatchType: &patchType,
    }
    review.Response = &response
    w.Header().Set("Content-Type", "application/json")
    json.NewEncoder(w).Encode(review)
}
Mutating webhooks are invoked sequentially. If a webhook hangs or responds slowly over the network, the entire resource creation pipeline stalls.
Schema Validation and Validating Admission
Once mutations are done, the server validates the object's schema against Go types or OpenAPI v3 schemas for CRDs. If a field contains an invalid value, the request is rejected with 422 Unprocessable Entity.
Next come the validating webhooks (ValidatingAdmissionWebhook), such as OPA Gatekeeper or Kyverno. They run in parallel and enforce security policies:
apiVersion: admissionregistration.k8s.io/v1
kind: ValidatingWebhookConfiguration
metadata:
  name: security-policy-checker
webhooks:
  - name: check-privileged.corp.local
    rules:
      - apiGroups: [""]
        apiVersions: ["v1"]
        operations: ["CREATE", "UPDATE"]
        resources: ["pods"]
    clientConfig:
      service:
        name: policy-engine
        namespace: security
        path: "/validate-pods"
    admissionReviewVersions: ["v1"]
    sideEffects: None
    timeoutSeconds: 3
    failurePolicy: Fail
With failurePolicy: Fail, a failing webhook completely blocks deployments.
Phase 4: Serialization and Writing to etcd
The manifest has cleared every checkpoint. The internal RESTStorage layer converts the resource's Go struct into its storage version (storage version) and serializes it into Protocol Buffers.
The write happens via a gRPC call to etcd under a key like:
/registry/deployments/default/my-awesome-app
The transaction uses optimistic locking by checking resourceVersion. If the object changed while the request was in flight, etcd rejects the transaction and the API server returns 409 Conflict. We covered how declarative field ownership in Server-Side Apply minimizes these conflicts in a separate piece.
Once the transaction is committed to the Raft log, the server replies to the client with 201 Created. Only then do the controllers in kube-controller-manager and the scheduler learn about the new resource via the Watch API and begin actually spinning up pods on nodes.